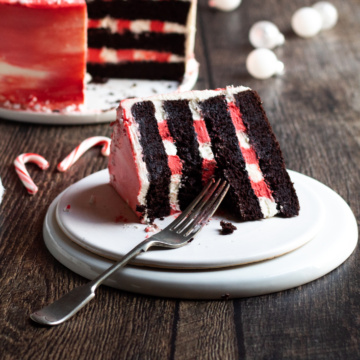
Chocolate Peppermint Cake (Gluten Free)
Fudgy, creamy, minty! This cake is not only super delicious, but it’s super fun and festive too! Using gluten free all-purpose flour, this cake is gluten friendly too!
Equipment
- Stand mixer
- Paddle attachment
- Whisk attachment
- Parchment paper
- 8-inch cake pans
- Measuring spoons
- Measuring cups
- Spatula
- Offset spatula
Ingredients
Chocolate Peppermint Cake Ingredients
- 2 ¼ cups granulated sugar
- 1 ¼ cups unsalted butter room temperature
- 2 each eggs
- 3 cups gluten free all purpose flour
- ⅔ cup dark cocoa powder
- 1 ½ teaspoons baking soda
- 1 teaspoon baking powder
- ½ teaspoon coarse Kosher salt
- 2 cups whole milk
- 1 tablespoon white vinegar
- 2 teaspoons peppermint extract
- 1 teaspoon vanilla extract
- ½ cup dark chocolate chips melted
- 1-2 each candy canes crushed
Peppermint Cream Cheese Frosting Ingredients
- 2 cups cream cheese room temperature
- 1 ½ cups unsalted butter room temperature
- 8 cups powdered sugar
- 1 tsp peppermint extract
- ½ tsp coarse Kosher salt
- Red food coloring (paste or liquid)
Instructions
- Preheat the oven to 350°F. Brush 2 8-inch baking pans with unsalted butter, and dust with gluten free all-purpose flour. Place a circle of parchment paper at the bottom of each pan, and set aside.
- Place granulated sugar and butter in a mixing bowl, fitted with a paddle attachment, Turn the mixer on high and cream together sugar and butter until light and fluffy, about 2 minutes. Turn the mixer off, and scrape down the bowl. Add eggs, one at a time, scraping down the bowl after each addition.
- Whisk together gluten free all-purpose flour, dark cocoa powder, baking soda, baking powder, and salt in a medium bowl and set aside. Mix milk, white vinegar, peppermint extract, and vanilla extract in a measuring cup.
- Add ⅓ of the dry ingredients to the mixing bowl, and mix on low speed just until combined. Turn the mixer off, and scrape down the sides of the bowl. Add ½ of the milk mixture, and mix on low speed just until combined. Turn the mixer off, and scrape down the sides of the bowl. Add another ⅓ of the dry ingredients to the mixing bowl, and mix on low speed until combined. Turn off the mixer, and scrape down the sides of the bowl. Add remaining milk mixture, and mix on low speed just until combined. Turn the mixer off, and scrape down the sides of the bowl. Repeat with the remaining dry ingredients.
- Once the ingredients have all been added, place the chocolate chips into a microwave safe bowl, and microwave on high for 1 minute. Stir well, and if needed, microwave in 20 second increments until the chocolate is melted. Add about ⅓ cup of the cake batter to the bowl of melted chocolate and mix until well combined. Add the mixture back to the cake batter, and gently fold until well combined.
- Divide evenly among the two cake pans. Place pans in the oven and bake for 35-40 minutes, or until the cake bounces back when gently pressed in the center or a toothpick inserted in the center comes out clean. Remove from the oven, and place on a cooling rack for 10-15 minutes. Turn the cakes out onto the cooling rack and let cool completely.
- While the cakes cool completely, make the Peppermint Cream Cheese Frosting. To make the frosting, place cream cheese in the bowl of the stand mixer, fitted with a whisk attachment. Whisk on medium speed until the cream cheese is blended and beginning to become fluffy. Add the butter, and mix until well combined.
- Add the powdered sugar, peppermint extract, and salt to the bowl, mix on low speed until the sugar is incorporated. Turn the mixer off and scrape down the sides of the bowl. Turn the mixer on high speed, and whip until light and fluffy. Turn the mixer off, and scrape down the bowl again. Turn the mixer on high, and whisk 1-2 minutes until the mixture is smooth and well incorporated.
- Remove the bowl from the stand mixer, and place about ⅓ of the frosting in a medium bowl. Whisk 1 tsp red food coloring or 15-20 drops of red gel food coloring into the medium bowl of frosting until you have reached the desired degree of red.
- To ice the cake, place red frosting into a piping bag or large zip top bag. Place a bit of white frosting into another piping bag or large zip top bag. Cut the end of the piping bag or corner of a zip top bag to create a ½ inch opening.
- To frost the cake, first cut each cake in half crosswise, creating four layers of cake. Place the bottom layer of cake onto a cake stand or plate and place on a turntable (if you have one!). Beginning with the white frosting, pipe a circle around the outside edge of the bottom layer of cake. Next to the white frosting circle, place a circle of red frosting. Repeat the process with the white frosting and red frosting until you have covered the entire layer of cake. Repeat the process with the next 3 layers of cake, and finally place the top layer on top of the cake.
- Chill the cake, until the center layers of frosting are firm, about 15 minutes. Frost the outside of the cake with white frosting, creating a “crumb coat”, and then repeating the frosting layers until there is no cake showing through. Refrigerate the cake between layers of frosting for about 15 minutes at a time.
- Next, pipe small dots of red frosting onto the outside of the cake, and gently spread, creating a “tie dye” effect. Sprinkle crushed candy canes around the outside of the top of the cake and around the base of the cake. Place the cake in the refrigerator until ready to serve.
- About 30 minutes before serving, remove the cake from the refrigerator. ENJOY!
Tried this recipe?Let us know how it was!